Hadoop on OpenStack with a CLI: Creating a cluster

January 29, 2014

OpenStack Savanna can already help you create a Hadoop cluster or run a Hadoop workload all through the Horizon dashboard. What it could not do until now is let you do that through a command-line interface.

Part of the Savanna work for Icehouse is to create a savanna CLI. It extends the Savanna functionality as well as gives us an opportunity to review the existing v1.0 and v1.1 REST APIs in preparation for a stable v2 API.

A first pass of the CLI is now done and functional for at least the v1.0 REST API. And here’s how you can use it.

Zeroth, get your hands on the Savanna client. Two places to get it are RDO and the OpenStack tarballs.

First, know that the Savanna architecture includes a plugin mechanism to allow for Hadoop vendors to plug in their own management tools. This is a key aspect of Savanna’s vendor appeal. So you need to pick a plugin to use.

$ savanna plugin-list
+---------+----------+---------------------------+
| name    | versions | title                     |
+---------+----------+---------------------------+
| vanilla | 1.2.1    | Vanilla Apache Hadoop     |
| hdp     | 1.3.2    | Hortonworks Data Platform |
+---------+----------+---------------------------+

I chose to try the Vanilla plugin, version 1.2.1. It’s the reference implementation,

export PLUGIN_NAME=vanilla
export PLUGIN_VERSION=1.2.1

Second, you need to make some decisions about the Hadoop cluster you want to start. I decided to have a master node using the m1.medium flavor and three worker nodes also using m1.medium.

export MASTER_FLAVOR=m1.medium
export WORKER_FLAVOR=m1.medium
export WORKER_COUNT=3

Third, I decided to use Neutron networking in my OpenStack deployment, it’s what everyone is doing these days. As a result, I need a network to start the cluster on.

$ neutron net-list
+---------------+------+-----------------------------+
| id            | name | subnets                     |
+---------------+------+-----------------------------+
| 25783...f078b | net0 | 18d12...5f903 10.10.10.0/24 |
+---------------+------+-----------------------------+
export MANAGEMENT_NETWORK=net0

The cluster will be significantly more useful if I have a way to access it, so I need to pick a keypair for access.

$ nova keypair-list
+-----------+-------------------------------------------------+
| Name      | Fingerprint                                     |
+-----------+-------------------------------------------------+
| mykeypair | ac:ad:1d:f7:97:24:bd:6e:d7:98:50:a2:3d:7d:6c:45 |
+-----------+-------------------------------------------------+
export KEYPAIR=mykeypair

And I need an image to use for each of the nodes. I chose a Fedora image that was created using the Savanna DIB elements. You can pick one from the Savanna Quickstart guide,

$ glance image-list
+---------------+----------------+-------------+------------------+------------+--------+
| ID            | Name           | Disk Format | Container Format | Size       | Status |
+---------------+----------------+-------------+------------------+------------+--------+
| 1939b...f05c2 | fedora_savanna | qcow2       | bare             | 1093453824 | active |
+---------------+----------------+-------------+------------------+------------+--------+
export IMAGE_ID=1939bad7-11fe-4cab-b1b9-02b01d9f05c2

then register it with Savanna,

savanna image-register --id $IMAGE_ID --username fedora
savanna image-add-tag --id $IMAGE_ID --tag $PLUGIN_NAME
savanna image-add-tag --id $IMAGE_ID --tag $PLUGIN_VERSION
$ savanna image-list
+----------------+---------------+----------+----------------+-------------+
| name           | id            | username | tags           | description |
+----------------+---------------+----------+----------------+-------------+
| fedora_savanna | 1939b...f05c2 | fedora   | vanilla, 1.2.1 | None        |
+----------------+---------------+----------+----------------+-------------+

FYI, --username fedora tells Savanna what account it can access on the instance that has sudo privileges. Adding the tags tells Savanna what plugin and version the image works with.

That’s all the input you need to provide. From here on the cluster creation is just a little more cut and pasting of a few commands.

First, a few commands to find IDs for the named values chosen above,

export MASTER_FLAVOR_ID=$(nova flavor-show $MASTER_FLAVOR | grep ' id ' | awk '{print $4}')
export WORKER_FLAVOR_ID=$(nova flavor-show $WORKER_FLAVOR | grep ' id ' | awk '{print $4}')
export MANAGEMENT_NETWORK_ID=$(neutron net-show net0 | grep ' id ' | awk '{print $4}')

Next, create some node group templates for the master and worker nodes. The CLI currently takes a JSON representation of the template. It also provides a JSON representation when showing template details to facilitate export & import.

export MASTER_TEMPLATE_ID=$(echo "{\"plugin_name\": \"$PLUGIN_NAME\", \"node_processes\": [\"namenode\", \"secondarynamenode\", \"oozie\", \"jobtracker\"], \"flavor_id\": \"$MASTER_FLAVOR_ID\", \"hadoop_version\": \"$PLUGIN_VERSION\", \"name\": \"master\"}" | savanna node-group-template-create | grep ' id ' | awk '{print $4}')

export WORKER_TEMPLATE_ID=$(echo "{\"plugin_name\": \"$PLUGIN_NAME\", \"node_processes\": [\"datanode\", \"tasktracker\"], \"flavor_id\": \"$WORKER_FLAVOR_ID\", \"hadoop_version\": \"$PLUGIN_VERSION\", \"name\": \"worker\"}" | savanna node-group-template-create | grep ' id ' | awk '{print $4}')

Now put those two node group templates together into a cluster template,

export CLUSTER_TEMPLATE_ID=$(echo "{\"plugin_name\": \"$PLUGIN_NAME\", \"node_groups\": [{\"count\": 1, \"name\": \"master\", \"node_group_template_id\": \"$MASTER_TEMPLATE_ID\"}, {\"count\": $WORKER_COUNT, \"name\": \"worker\", \"node_group_template_id\": \"$WORKER_TEMPLATE_ID\"}], \"hadoop_version\": \"$PLUGIN_VERSION\", \"name\": \"cluster\"}" | savanna cluster-template-create | grep ' id ' | awk '{print $4}')

Creating the node group and cluster templates only has to happen once, the final step, starting up the cluster, can be done multiple times.

echo "{\"cluster_template_id\": \"$CLUSTER_TEMPLATE_ID\", \"default_image_id\": \"$IMAGE_ID\", \"hadoop_version\": \"$PLUGIN_VERSION\", \"name\": \"cluster-instance-$(date +%s)\", \"plugin_name\": \"$PLUGIN_NAME\", \"user_keypair_id\": \"$KEYPAIR\", \"neutron_management_network\": \"$MANAGEMENT_NETWORK_ID\"}" | savanna cluster-create 

That’s it. You can nova list and ssh into the master instance, assuming you’re on the Neutron node and use ip netns exec, or you can login through the master node’s VNC console.

A recipe for starting cloud images with virt-install

January 8, 2014

I’m a fan of using the same OS image across multiple environments. So, I’m a fan of using cloud images, those with cloud-init installed, even outside of a cloud.

The trick to this is properly triggering the NoCloud datasource. It’s actually more of a pain than you would think, and not very well documented. Here’s my recipe (from Fedora 19),

wget http://download.fedoraproject.org/pub/fedora/linux/releases/test/20-Beta/Images/x86_64/Fedora-x86_64-20-Beta-20131106-sda.raw.xz
xz -d Fedora-x86_64-20-Beta-20131106-sda.raw.xz

echo "#cloud-config\npassword: fedora\nchpasswd: {expire: False}\nssh_pwauth: True" > user-data

NAME=node0
cp Fedora-x86_64-20-Beta-20131106-sda.raw.xz $NAME.raw
echo "instance-id: $NAME; local-hostname: $NAME" > meta-data
genisoimage -output $NAME-cidata.iso -volid cidata -joliet -rock user-data meta-data
virt-install --import --name $NAME --ram 512 --vcpus 2 --disk $NAME.raw --disk $NAME-cidata.iso,device=cdrom --network bridge=virbr0

Login with username fedora and password fedora.

You’ll also want to boost the amount of RAM if you plan on doing anything interesting in the guest.

You can repeat lines 6 through 10 to start multiple guests, just make sure to change the name in line 6.

If you want to ssh into the guest, you can use virsh console, login and use ifconfig / ip addr to find the address. Or, you can use arp -e and virsh dumpxml to match MAC addresses. Or just arp -e before and after starting the guest.

Note, you need to follow the meta-data and user-data lines very closely. If you don’t you may not trigger the NoCloud datasource properly. It took me a number of tries to get it right. Also, the volid needs to be “cidata” or it won’t be found, which turns out to be a configurable parameter for NoCloud. The chpasswd bit is to prevent being prompted to change your password the first time you login.

Consider becoming a fan of consistent OS images across your environments too!

Hello Fedora with docker in 3 steps

December 10, 2013

It really is this simple,

1. sudo yum install -y docker-io

2. sudo systemctl start docker

3. sudo docker run mattdm/fedora cat /etc/system-release

Bonus, for when you want to go deeper –

If you don’t want to use sudo all the time, which you shouldn’t want to do, you add yourself to the docker group,

$ sudo usermod -a -G docker $USER

If you don’t want to log out and back in, make your new group effective immediately,

$ su - $USER
$ groups | grep -q docker && echo Good job || echo Try again

If you want to run a known image, search for it on https://index.docker.io or on the command line,

$ docker search fedora

Try out a shell with,

$ docker run -i -t mattdm/fedora /bin/bash

Statistic changes in HTCondor 7.7

February 12, 2013

Notice to HTCondor 7.8 users –

Statistics implemented during the 7.5 series that landed in 7.7.0 were rewritten by the time 7.8 was released. If you were using the original statistics for monitoring and/or reporting, here is a table to help you map old (left column) to new (right column).

See – 7.6 -> 7.8 schedd stats
(embedding content requires javascript, which is not available on wordpress.com)

Note: The *Rate and Mean* attributes require math, and UpdateTime requires memory

How accounting group configuration could work with Wallaby

February 5, 2013

Configuration of accounting groups in HTCondor is too often an expert task that requires coordination between administrators and their tools.

Wallaby provides a coordination point, so long as a little convention is employed, and can provide a task specific interface to simplify configuration.

Quick background, Wallaby provides semantic configuration for HTCondor. It models a pool as parameters aggregated into features and nodes aggregated in groups, with features and individual parameters associated with nodes and groups. It provides semantic validation of configuration before it is distributed, and has expert knowledge for minimal impact configuration changes.

And, accounting group configuration in HTCondor is spread across seven fixed parameters (GROUP_NAMES, GROUP_ACCEPT_SURPLUS, GROUP_SORT_EXPR, GROUP_NAMES, GROUP_QUOTA_ROUND_ROBIN_RATE, GROUP_AUTOREGROUP, GROUP_QUOTA_MAX_ALLOCATION_ROUNDS), and another five dynamic parameters (GROUP_ACCEPT_SURPLUS_groupname, GROUP_AUTOREGROUP_groupname, GROUP_PRIO_FACTOR_groupname, GROUP_QUOTA_groupname, GROUP_QUOTA_DYNAMIC_groupname). These are dynamic because the “groupname” in the parameter is any name listed in the GROUP_NAMES parameter.

In addition to its other features, Wallaby has an extensible shell mechanism, which can be used to create task specific porcelain.

For instance, agree that tools and administrators will store accounting group configuration on a feature called AccountingGroups, and the tools can use Wallaby’s API to manipulate the configuration while the following porcelain can simplify the task for managing that configuration by administrators.

See – wallaby_accounting_group_porcelain.txt
(embedding content requires javascript, which is not available on wordpress.com)

Some htcondor-wiki stats

January 29, 2013

A few years ago I discovered Web Numbr, a service that will monitor a web page for a number and graph that number over time.

I installed a handful of webnumbrs to track things at HTCondor’s gittrac instance.

http://webnumbr.com/search?query=condor

Thing such as –

  • Tickets resolved with no destination: tickets that don’t indicate what version they were fixed in. Anyone wanting to know if a bug is fixed or feature was added to their version of HTCodnor and encounters one of these will have to go spelunking in the repository for their answer.
  • Tickets resolved but not assigned: tickets that were worked on, completed, but whomever worked on them never claimed ownership.
  • Action items with commits: tickets that are marked as Todo/Incident, yet have associated code changes. Once there is a code change the ticket is either a bug fix (ticket type: defect) or feature addition (ticket type: enhancement). Extra work is imposed on whomever comes after the ticket owner who wants to understand what they are looking at. Additionally, these tickets skew information about bugs and features in releases.
  • Tickets with invalid version fields: tickets that do not follow the, somewhat strict, version field syntax – vXXYYZZ, e.g. v070901. All the extra 0s are necessary and the v must be lowercase.

I wanted to embed the numbers here, but javascript is needed and wordpress.com filters javascript from posts.

Concurrency Limits: Group defaults

January 21, 2013

Concurrency limits allow for protecting resources by providing a way to cap the number of jobs requiring a specific resource that can run at one time.

For instance, limit licenses and filer access at four regional data centers.

CONCURRENCY_LIMIT_DEFAULT = 15
license.north_LIMIT = 30
license.south_LIMIT = 30
license.east_LIMIT = 30
license.west_LIMIT = 45
filer.north_LIMIT = 75
filer.south_LIMIT = 150
filer.east_LIMIT = 75
filer.west_LIMIT = 75

Notice the repetition.

In addition to the repetition, every license.* and filer.* must be known and recorded in configuration. The set may be small in this example, but imagine imposing a limit on each user or each submission. The set of users is board, dynamic and may differ by region. The set of submissions is a more extreme version of the users case, yet it is still realistic.

To simplify the configuration management for groups of limits, a new feature to provide group defaults to limit was added for the Condor 7.8 series.

The feature requires that only the exception to a rule be called out explicitly in configuration. For instance, license.west and filer.south are the exceptions in the configuration above. Simplified configuration available in 7.8,

CONCURRENCY_LIMIT_DEFAULT = 15
CONCURRENCY_LIMIT_DEFAULT_license = 30
CONCURRENCY_LIMIT_DEFAULT_filer = 75
license.west_LIMIT = 45
filer.south_LIMIT = 150

In action,

$ for limit in license.north license.south license.east license.west filer.north filer.south filer.east filer.west; do echo queue 1000 | condor_submit -a cmd=/bin/sleep -a args=1d -a concurrency_limits=$limit; done

$ condor_q -format '%s\n' ConcurrencyLimits -const 'JobStatus == 2' | sort | uniq -c | sort -n
     30 license.east
     30 license.north
     30 license.south
     45 license.west
     75 filer.east
     75 filer.north
     75 filer.west
    150 filer.south

Your API is a feature, give it real resource management

January 14, 2013

So much these days is about distributed resource management. That’s anything that can be created and destroyed in the cloud[0]. Proper management is especially important when the resource’s existence is tied to a real economy, e.g. your user’s credit card[1].

EC2 instance creation without idempotent RunInstance

EC2 instance creation without idempotent RunInstance

Above is a state machine required to ensure that resources created in AWS EC2 are not lost, i.e. do not have to be manually cleaned up. The green arrows represent error free flow. The rest is about error handling or external state changes, e.g. user terminated operation. This is from before EC2 supported idempotent instance creation.

The state machine rewritten to use idempotent instance creation,

EC2 instance creation with idempotent RunInstance

EC2 instance creation with idempotent RunInstance

What’s going on here? Handling failure during resource creation.

The important failure to consider as a client is what happens if you ask your resource provider to create something and you never hear back. This is a distributed system, there are numerous reasons why you may not hear back. For simplicity, consider the client code crashed between sending the request and receiving the response.

The solution is to construct a transaction for resource creation[2]. To construct a transaction, you need to atomically associate a piece of information with the resource at creation time. We’ll call that piece of information an anima.

In the old EC2 API, the only way to construct an anima was through controlling a security group or keypair. Since neither is tied to a real economy, both are reasonable options. The non-idempotent state machine above uses the keypair as it is less resource intensive for EC2.

On creation failure and with the anima in hand[3], the client must search the remote system for the anima before reattempting creation. This is handled by the GM_CHECK_VM state above.

Unfortunately, without explicit support in the API, i.e. lookup by anima, the search can be unnatural and expensive. For example, EC2 instances are not indexed on keypair. Searching requires a client side scan of all instances.

With the introduction of idempotent RunInstances, the portion of the state machine for constructing and locating the anima is reduced to the GM_SAVE_CLIENT_TOKEN state, an entirely local operation. The reduction in complexity is clear.

After two years, EC2 appears to be the only API providing idempotent instance creation[4]. Though APIs are starting to provide atomic anima association, often through metadata or instance attributes, and some even provide lookup.

You should provide an idempotent resource creation operation in your API too!

[0] “in the cloud” – really anywhere in any distributed system!
[1] Making money from forgotten or misplaced resources is a short term play.
[2] Alternatively, you can choose an architecture with a janitor process, which will bring its own complexities.
[3] “in hand” – so long as your hand is reliable storage.
[4] After a quick survey, I’m looking at you Rackspace, RimuHosting, vCloud, OpenNebula, OpenStack, Eucalyptus, GoGrid, Deltacloud, Google Compute Engine and Gandi.

Web design complexity

January 7, 2013

One thing that has always impressed me is the ability of web designers to deal with browser idiosyncrasies.

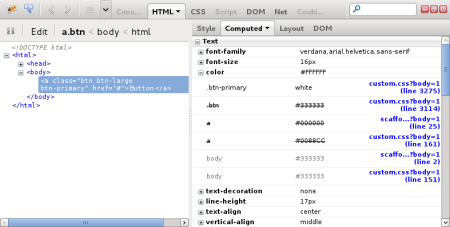
For instance, knowing why this happens in firefox-17.0.1-1.fc17.x86_64 –

A bootstrap btn-primary viewed from 0.0.0.0

A bootstrap btn-primary viewed from 0.0.0.0

A bootstrap btn-primary viewed from localhost

A bootstrap btn-primary viewed from localhost

A bootstrap btn-primary firebug computed color from 0.0.0.0 and localhost

A bootstrap btn-primary firebug computed color from 0.0.0.0 and localhost

Needless to say, the web is littered with questions about why btn-primary background color is not always white. Most have answers, some with varying degrees of complex css. Others involve changing versions of software. All the while it might just be the URL used to view the page.

Test in a production environment.

Configuration and policy evaluation

December 10, 2012

Figuring out how evaluation happens in configuration and policy is a common problem. The confusion is justified.

Configuration provides substitution with $() syntax, while policy is full ClassAd language evaluation without $() syntax.

Configuration is all the parameters listed in files discoverable with condor_config_val -config.

$ condor_config_val -config
Configuration source:
	/etc/condor/condor_config
Local configuration sources:
	/etc/condor/config.d/00personal_condor.config

Policy is the ClassAd expression found on the right-hand side of specific configuration parameters. For instance,

$ condor_config_val -v START
START: ( (KeyboardIdle > 15 * 60) && ( ((LoadAvg - CondorLoadAvg) <= 0.3) || (State != "Unclaimed" && State != "Owner")) )
  Defined in '/etc/condor/condor_config', line 753.

Configuration evaluation allows for substitution of configuration parameters with $().

$ cat /etc/condor/condor_config | head -n753 | tail -n1
START			= $(UWCS_START)

$ condor_config_val -v UWCS_START
UWCS_START: ( (KeyboardIdle > 15 * 60) && ( ((LoadAvg - CondorLoadAvg) <= 0.3) || (State != "Unclaimed" && State != "Owner")) )
  Defined in '/etc/condor/condor_config', line 808.

$ cat /etc/condor/condor_config | head -n808 | tail -n3
UWCS_START	= ( (KeyboardIdle > $(StartIdleTime)) \
                    && ( $(CPUIdle) || \
                         (State != "Unclaimed" && State != "Owner")) )

Here START is actually the value of UWCS_START, provided by $(UWCS_START).

The substitution is recursive. Explore /etc/condor/condor_config and the JustCPU parameter. It is actually a parameter that is never read by daemons or tools. It is only useful in other configuration parameters. It’s shorthand.

Policy evaluation is full ClassAd expression evaluation. The evaluation happens at the appropriate times while daemons or tools are running.

Taking START as an example, the words KeyboardIdle, LoadAvg, CondorLoadAvg, State are attributes found on machine ads, and it is evaluated by the condor_startd and condor_negotiator to figure out if a job is allowed to start on a resource.

$ condor_status -l slot1@eeyore.local | grep -e ^KeyboardIdle -e ^LoadAvg -e ^CondorLoadAvg -e ^State
KeyboardIdle = 0
LoadAvg = 0.290000
CondorLoadAvg = 0.0
State = "Owner"

Evaluation happens by recursively evaluating those attributes. The expression ((KeyboardIdle > 15 * 60) && (((LoadAvg - CondorLoadAvg) <= 0.3) || (State != "Unclaimed" && State != "Owner"))) becomes ((0 > 15 * 60) && (((0.29 - 0.0) <= 0.3) || ("Owner" != "Unclaimed" && "Owner" != "Owner"))). And so forth.

That’s it.